|
Check the following items.
1. Check to see if the needle is installed correctly.
2. Check that the needle is not bent.
3. Confirm that the correct type of needle is installed.
4. Check to see if the thread is placed correctly in the tension discs.
5. Check to see if the machine is threaded correctly.
6. Make sure that the needle is all the way up in the needle holder.
7. Check the needle height.
If the needle is positioned too high, the needle thread loop is made small.
If the needle is positioned too high, the needle guard does not receive the needle.
8. Check the needle height.
If the needle is positioned too low, the needle thread loop is made large.
If the needle is positioned too low, the needle guard collapses the needle thread
loop.
9. Check the lower looper-needle setting distance.
If this distance is small, the needle thread loop is made small.
If this distance is small, the point of the lower looper reaches the center of the
needle when the needle thread loop is not formed. Then the point of the lower looper
does not enter the needle thread loop.
10. Check the lower looper-needle setting distance.
If this distance is large, the needle thread loop collapses and the lower looper does
not enter the needle thread loop.
If this distance is large, the lower looper passes below the needle? eye.
11. Check that the clearance between the needle and the lower looper is not too large.
12. Confirm that the front or rear needle guard presses the needle excessively.
13. Check to see if the front or rear needle guard receive the needle properly.
14. Make sure that the proper needle thread tension is
obtained. To obtain the proper needle
thread tension, position the needle thread take-up and thread guides correctly in place.
15. Make sure that the thread tension spring works properly.
|
|
|
2-Skip stitching that occurs due to the relationship between the needle and the upper looper
Check the following items. |
|
|
|
Check the following items.
1. Check to see if the needle is installed correctly.
2. Check that the needle is not bent.
3. Confirm that the correct type of needle is installed.
4. Check to see if the machine is threaded correctly.
5. Make sure that the needle is all the way up in the needle holder.
6. Check the needle height. If the needle is positioned too high, the needle does not enter the
triangle formed by the upper looper thread.
7. Check the needle height. If the needle is positioned too low, the needle does not enter the
triangle formed by the upper looper thread.
8. If the upper looper-needle setting distance is too small, the needle does not enter the
triangle formed by the upper looper thread.
9. If the upper looper-needle setting distance is too large, the needle does not enter the
triangle formed by the upper looper thread.
10. Check that the clearance between the needle and the rear side of the upper looper is not
too large.
Check to make sure that the upper looper being used matches the size of the
needle.
Check to make sure that the upper looper being used matches the type of the
machine.
11. Check that the needle plate finger is not damaged.
12. Check that the needle thread is not excessively tightened.
|
|
To
the top |
|
|
|
3-Skip stitching that occurs due to the relationship between the upper looper and lower loopers |
|
|
|
Check the following items.
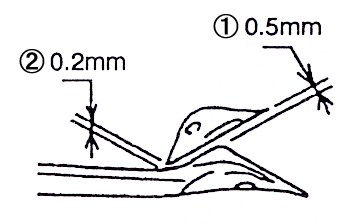
1. Check that the clearance 1 between the upper and lower loopers is not too large.
2. Check that the clearance 2 between the upper and lower loopers is not too large.
3. Check that the point of the upper looper is not worn away.
|
|
To
the top |
|
|
|
4-Thread breakage |
|
|
|
Check the following items.
1. Make sure that the size of the needle matches that of the thread.
2. Check to see if the machine is threaded correctly.
3. Check to make sure that there are no nicks or burrs on the top of the needle? eye.
4. Check to see if the needle is installed correctly.
5. Check that the needle is not bent.
6. Check to see if the center of the thread guide is aligned with that of the core of the
thread cone.
7. Check that the needle does not generate heat.
8. Make sure that the proper needle thread tension is obtained.
9. Check to see that each thread guide is not damaged.
10. Check to make sure that the needle is not positioned too high.
11. Check to make sure that the lower looper-needle setting distance is not too large.
12. Check to see that the clearance between the needle and the lower looper is not too large.
13. Check to see that the point of the lower looper is not damaged.
14. Check that there are no nicks or burrs around the eyes of the upper and lower loopers.
15. Check that the upper and lower looper threads are not excessively tightened.
16. Check to see if the thread take-up and thread guides are positioned in place.
|
|
To
the top |
|
|
|
5-Needle breakage |
|
|
|
Check the following items.
1. Confirm that the size of the needle is correct.
2. Make sure that the needle is all the way up in the needle holder.
3. Check to see if the needle is installed correctly.
4. Make sure that the proper needle thread tension is obtained.
5. Check to see that the needle does not contact the needle plate.
6. Check to see that the needle does not contact the presser foot.
7. Check to see that the needle does not contact the needle cooling device.
8. Check that the front or rear needle guard does not press the needle excessively.
9. Check to see that the needle does not contact the lower looper.
10. Check the presser foot height. If the presser foot is installed too low, seam jamming
occurs, causing needle breakage.
|
|
To
the top |
|
|
|
6-Improper thread tension |
|
|
|
Check the following items.
1. Check to see if the machine is threaded correctly.
2. Make sure that the size of the thread matches that of the needle? eye.
3. Check to see if the thread is placed correctly in the tension discs.
4. Check to see that there is no dirt and dust between the tension discs.
5. Check to see if the thread take-up and thread guides are positioned in place.
6. Make sure that the overedge width matches the size of the needle plate finger.
7. Check to see that each thread guide is not damaged.
8. Confirm that the proper balance between the threads being used is achieved.
|
|
To
the top |
|
|
|
7-Unevenly-finished seams. |
|
|
|
Check the following items.
1. Check to see if the machine is threaded correctly.
2. Check to see if the thread take-up and thread guides are positioned in place.
3. Check to see that each thread guide is not damaged.
4. Make sure that the proper cutting action between the cutting edges of the knives is
obtained.
5. Check that the height of the lower knife is correct.
6. Confirm that the presser foot pressure is proper.
7. Check that the height of the feed dogs is correct.
8. Check to see if the top surface of the main feed dog is flush with that of the differential
feed dog.
9. Make sure that the proper needle plate finger is selected according to the overedge width.
10. Make sure that the width of the fabric edge is trimmed properly according to the
overedge width.
11. Confirm that the proper balance between the threads being used is achieved.
|
|
To
the top |
|
|
|
8-Seam jamming. |
|
|
|
Check the following items.
1. Check that the feed dogs are not installed too low.
2. Check to see if the top surface of the main feed dog is flush with that of the differential feed dog.
3. Make sure that the proper cutting action between the cutting edges of the knives is obtained.
4. Check that the presser foot pressure is not too low.
5. Check that the pitch of the feed dog teeth is not too small.
|
|
To
the top |